I've received some questions recently regarding the Bind-It-All and punching circles. The issue is the partially punched hole that you often see when you punch your CD or coaster or whatever. People wonder if there's a trick to punching so that there aren't partially punched holes. The short answer is, no. There really isn't. It's just the nature of the shape and the fixed distance between the punched holes. If you look closely at projects made with CDs or coasters and the BIA, you'll find that there are partially punched holes. Sometimes they're just well-disguised, and sometimes you just don't notice them.So, why the long post? Well, you can try to minimize the look of the partially punched hole. As usual, I try to make this fairly foolproof. That's the BIA, a piece of transparency, and a coaster.
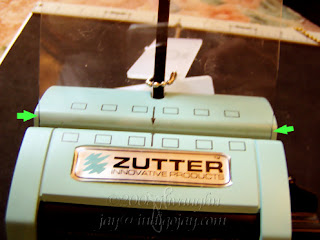 My scrap transparency just happened to be close to the width of the BIA. I marked the edges with black Sharpie so that they showed up better. That's what the arrows are pointing to. I was confident that I could reliably place this in the machine in the same position time and again. If you're not so sure, make yours the exact width of the machine.Place it all the way in and punch it.
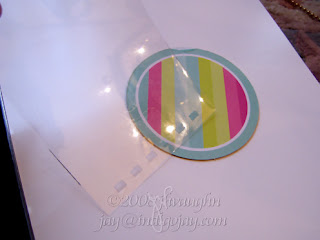 Now I have a template to use with my coaster or with whatever I want to punch.
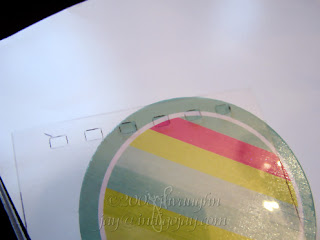 Here you can see that I could punch four holes and not get that partial hole. Those two holes at either end are very close to the edge though....
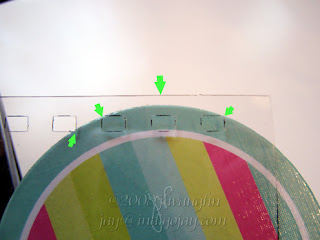 I could try for three holes. The partial hole would be minimized as you can see looking at the arrow at the far left. Two of the holes would be very close to the edge though. I also wanted to point out that this placement would mean not inserting the coaster completely into the BIA to punch it. That's what the biggest arrow at the center is pointing out.
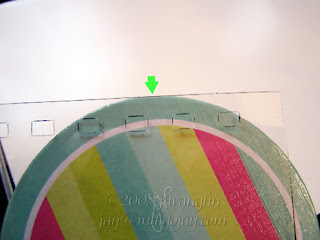 Contrast that with this position of the template where the coaster would be inserted completely.
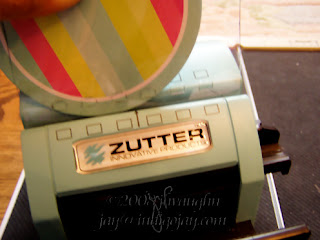 So let's see what happens with punching four holes. I keep hold of the template and the coaster, line up my template with the BIA so that the holes and edges are where they need to be.
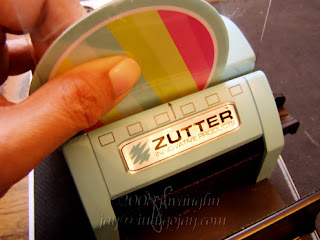 Still holding those two items in place, I insert the transparency to the bottom and then punch. By the way, you could always use a paper clip or binding clip if you don't think that you can hold the transparency and coaster or CD or whatever together and keep them from moving.
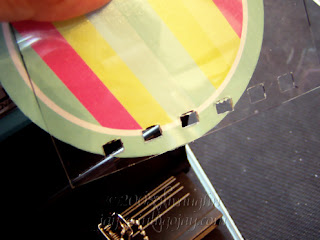 Here's the result. As I'd said, two of those holes were very close to the edge and they did break through.So, what about three holes instead?
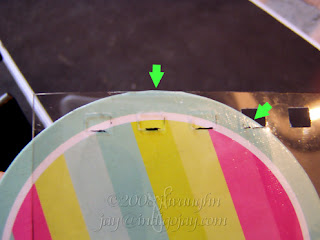 Inserted fully, there would be a fairly big partial cut that you can see indicated by the arrow at the right.
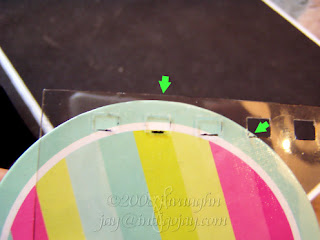 The effect can be minimized by not inserting the coaster completely, but you also need to keep an eye on where the corners of those holes at the ends will land. You can't really get rid of the partial cut and have the holes all be nicely punched.
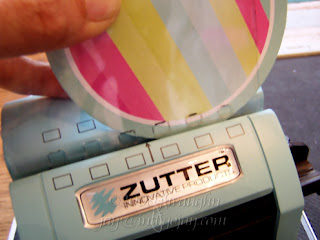 I'm going for the more minimized partial cut, so I hold the coaster and transparency in place and line up the transparency with the BIA opening.
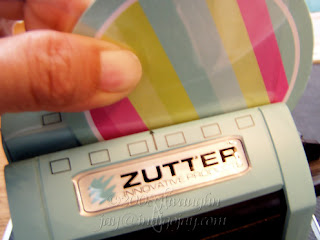 I insert those until I feel the transparency touch the bottom, and then I punch.
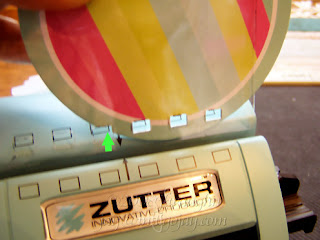 There you can see the partial cut, but my other holes were about as close to the edge as I would want them to be, so that looks like it was the best compromise.I didn't pull out my coils, but keep in mind that when you finish your project, that partial cut doesn't need to show, or it might fade into the background because of your fabulous embellishing. :-)
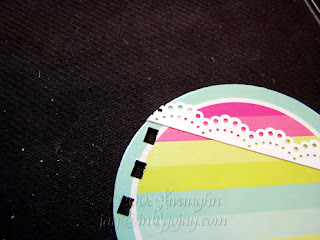 Maybe you'll have a decorative border that will go all the way to that edge.
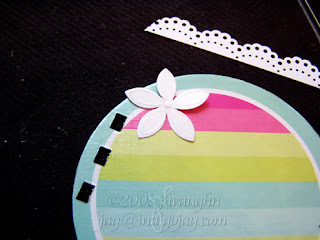 Flowers can be a nice touch, and those petals are great for disguising things.
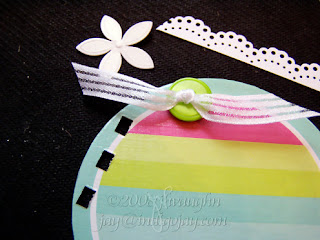 Ribbon can also work and doesn't have to cover the partial cut directly, so can die cuts or lace or anything else that would draw the eye away from that partial cut. If you're one who likes to tie things on the coil, adding something near the top of the coil would certainly help disguise that partial cut. I think this is one of those times where if you can't beat 'em, join 'em. Just think of this as a wonderful opportunity to exercise creative embellishment. :-)
This morning I noticed that the counter on this blog ticked over 18000 hits. There have actually been more than that since I didn't have a counter when I started and since I've had to reset it at least once along the way. LOL! But still, it's a milestone of sorts. I also noticed a few old posts that have been racking up some hits lately. These are posts from some time back. It's neat to see that people must be getting something useful out of them. When I get into crafting and come across ideas that seem like they might be helpful, I try to include them here. I thought I'd do a recap of sorts. Yeah, and I also don't have any new cards to post yet today. I could just say, "Hey, be sure to click over on the Mini-Tutorial & Tips menu over on my sidebar," but that'd be too easy. I'll just recap some of the more informative type posts.So, here goes....
- Using The Font Thing - I love this application for managing my fonts. I have over 1400 of them at last count. Really, I do know that there are a lot of folks out there who have more! TFT saves me a lot of time when I'm searching for a particular look.
- Using the Big Shot to emboss with brass stencils - this goes for the Cuttlebug, too, but I don't know what the specific sandwich combos are since it has the various plates and I just use the multipurpose platform. The principle is the same for both machines, and I showed how to emboss so that the edges of the brass stencil won't show if you don't want them to.
- The Bind It All - I posted quite a bit of info about this when it first came out. There's a post describing how the machine works. There's a chart that summarizes the approximate coil size that would be needed to bind a certain number of pages. There is also a work-around for those small 1/4" coils--this was before Zutter came out with their plastic gizmo, the space bar add on. You know, that thing that you get for free but it costs $2.99. LOL! Just strikes me as funny. I realize that S/H costs money, but really--folks had come up with work-arounds and for cheaper. Crafters are so creative.
- Manual die cutters - all sorts of questions came up about these when the Cuttlebug was released. Everyone wanted to know which dies could be used in which machines and with what materials. I tried to summarize the info that I found in various forums and those are in a couple of charts. I tried to include all of the major die cutters and dies, so there's info about which dies you can use whether you have a Sizzix, Cuttlebug, Big Shot, Big Kick, Wizard, Bosskut, Sidekick, Tag-along, Zip 'e mate, or Quickutz. I also tried to include info in another chart about what sorts of materials each type of die could cut, and I included acetate, cardstock, chipboard, cork, fabric, felt, fun foam, foil, HVAC tape, magnet paper, shrink plastic, transparency, vellum, and velveteen paper.
- Those Cuttlebug embossing folders and those Nestabilities dies! Both are so much fun! They're great to use as is, but I made a couple of posts about partial Cuttling and partial Nesties, using these folders and dies in slightly different ways. I think that the partial technique is probably something that can be applied to any of the die machines that use a "sandwich". The idea is to take some of the guesswork out of it when you want to emboss or cut only so far. Instead of rolling your sandwich combo in and then backing out, a method that's rather imprecise since you have to guess when you've rolled it far enough, you set it up so that you just roll the combo through and leave the part that you want to leave unembossed outside of the sandwich. Voila! No pressure applied means no embossing.
- Info about the Scor-It - scoring boards have become very popular and it seems like there is an ongoing dialogue about the Scor-It vs the Scor-pal and which is better and so forth. I've had the Scor-It for a couple of years and have been satisfied and not inclined to buy yet another board, so I'm not taking sides on this one. I'd read about people having trouble making accurate scores with the Scor-It though, so I compiled info that I'd found about troubleshooting that particular issue with the Scor-It.
I hope this will sort of act as a refresher about some of what can be found here. Also, the labels in my sidebar can be useful for finding relevant posts. Blogger seems to arrange them by frequency first, so the ones referenced most often are at the top, then alphabetical after that.
I read about making clear mini-albums on the Two Peas site. There was a sample by Page Frame Designs linked there. The albums were pricy, but really neat! Naturally, being the creative people that they are, some of the Peas started looking to make their own from less pricy materials. Here's what I came up with.
This isn't an album, as in a photo album. This was my first try at working with clear acetate, so I was just playing around, using various techniques and assorted items that I came across as I was experimenting. The album was made out of clear acetate that I found at Hobby Lobby in the stained glass department. It cost me $1.99 for a good-sized sheet. It was easy to cut with a craft knife--you run the knife where you want your cut to be. Do that several times and then snap it off. It should make a clean break, unless you become impatient like I did. That's why you'll see some jagged edges on mine, but hey, it's an experiment! Learn from my mistakes! LOL! If you look for them at Michael's they're called styrene blanks.
I used rub ons, Palette hybrid inks, glue dots, and crystal lacquer on this project. Primas and stickles were fun embellishments, too. I also used some clear playing cards and a coffee cup sleeve from Starbucks. I think almost anything goes! By the time I was finished, my book was about 3/4" thick. My Bind It All had easily punched through each page--I'd done this before decorating, by the way. I'm sure that the Cropadile would work on this, too. I bound it with 7/8" binding wire. I didn't try my corner rounder, but I've heard that it will work on these pages as well. That would be a nice touch. But not a bad result for only spending a couple of bucks on acetate! Fun, too! Next time I'll also work from the back to the front to get a better handle on how the finished project looks. Working with a clear medium sure opens up different possibilities.
Oh, this is great! Susan over at the Gingerwood forums worked up a chart that lists the cover sizes, inner page sizes, and the number of holes in the spine for the various sizes when using the Bind It All--no more guesswork when you're trying to figure out how many holes there will be when you're making a project of a particular size. Thank you, Susan!Here is the chart: http://www.gingerstamp.com/binditall/And don't forget that if you're still trying to decide what size coil to use for your project, I have a coil chart on my blog: Coil Binding ChartThere are also other tidbits of information scattered throughout my blog RE: the Bind It All. Click on the Bind It All label below to see all of them. Click on the coils label, too, because there's some info that can be found that way as well.
 This is a card that I made using the Bind It All machine and 5/8" coils. The card itself is lightweight chipboard covered with DCWV Once Upon a Time papers. The stamps are by Non Sequitur, Hampton Art, and Inkadinkado. The flower embellishments are Primas.I like the way this turned out. This was before I had the 3/8" coils in hand. That's the only thing I'd change about the structure--I'd use slightly smaller coils.
I think that the Spring Cleaning bug bit me--I've not had anything new to post because I decided to unmount my wood mounted stamps. I started with just one drawer. When I saw that small pile of rubber and compared it to the size of the drawer that the mounted versions used to occupy, my jaw dropped and I understood why people did this. It's a HUGE amount of space to reclaim! So, I've been pulling rubber off of mounts for the last few days. My problem now is deciding how to store all of this wonderful rubber. I have CD cases, but I'm not sure that's the way I want to go. I have some in binders, and I've not been totally sold on that. I have some on stiff boards inside clear plastic folders and huge ziplocks. I'm actually most fond of that system. I like being able to thumb through and pull out just one folder instead of a big binder. I put my rubber on the boards, stamp an index sheet, or two if I've covered both sides, and then slip that inside the envelope with the sheet images showing on both sides. Some of my stamps are bare rubber. Some are on EZ mount. Some have cling vinyl stuck to the adhesive side of the cushion. They take up a lot less space though! I love my acrylic mounts and have Tack 'N Peel on one side for bare rubber stamps, and stamps with EZ mount can be used on the other side. Works great! Now I just need to finish organizing and storing them.I also wanted to mention a great idea that someone posted in reply to one of my Bind It All posts regarding the 1/4" coils. Jennifer S said that she cut a piece of fun foam, that happens to be 1/16" thick, to use in the slot of her Bind It All. I KNEW that someone would come up with a great solution! YAY! Just cut it a little longer than the slot and it can be easily slipped in when needed and removed when not needed. Great idea, Jennifer, and thanks for mentioning it!On another note, I noticed when I went to the dashboard to start this new post that with my last post I'd hit 100 posts! WOO HOO! Not bad for someone who'd just started this on a lark. :-)
Here is my entry for this week's Wednesday Stamper theme, The Eyes Have It! This is a booklet that I put together using my Bind It All machine and 1/4" white binding coil. These are chipboard covers covered with DCWV textured cardstock. The covers and inside pages were cut using a Sizzix diamond shaped die. The paisley is a die cut by Spellbinders. The stamped image is by Paper Impressions. The flowers are Primas.
I wrote most of this last night. This was before I had my AHA! moment of trimming the punched edge of the pages so that they'd fit nicely inside the 1/4" coil. It occurred to me that this could still be useful, particularly with covers, because if the edges have been wrapped, slicing off one edge could look unfinished. So here's how I adjusted my punching so that the holes would be uniformly closer to the edge....
I mentioned the problem with getting pages to lie flat when using the very small 1/4" binding wire coils with the Bind It All. The problem is that too much paper ends up inside the coil and the pages overlap.
 My solution was to move the paper in such a way that the holes would be punched closer to the edge. Now granted this may make the pages a tad more prone to being 'torn out', but it's a trade off in order to have the pages turn properly. The question was how to move the holes so that they'd be uniform. This is what I did.Let's say that the darker green cardstock is what I'm using for my project. I cut another piece of scrap cardstock (the lighter green) so that it was just over 1/16" wider than the cardstock for my project.
 I then inserted that combo into the slot of my Bind It All, holding the layers in place. The light green edge goes in first.
 Once you feel the leading edge reach the bottom of the slot, go ahead and press the lever as you normally would.
 You can see that the edge of my darker cardstock is now only about an 1/8" wide. The lighter green cardstock has the normal edge of 3/16" that wouldn't allow pages to move properly within the 1/4" diameter coil.
To go back to my first example, pages punched this way will now lie flat.
 So, the key points to remember are...
- You can use the 5/16" plastic template to set your binding width. In my experience it will close the 1/4" coil properly.
- You'll need to trim the punched edge of your pages if you want them to turn easily and lie flat. You can do this by actually trimming them, or you can punch them in such a way that the holes will be closer to the edge of the page.
- These coils look great with smaller projects, so don't be afraid to use them!
I used this process to make a small coil bound book. I'll put that in a new entry.
I received a package in the mail today. It was the small coils for my Bind It All from Bonnie's Best. Have I mentioned lately how great her service is? I ordered these over the weekend. Love having them in my hands so quickly!Here's my FYI. I don't have any pics yet. I was just playing, but I know that I'll be making some smaller projects and I wanted some of the smaller coils. I ordered some of the 1/4" coils. These are very small, but they could be perfect for some smaller items. Since there's no plastic template for 1/4", I decided to use the 5/16" and see how that worked. It was fine. The wire is thinner and softer, so I think it doesn't 'rebound' as much when the pressure is released. Here's the catch though. The pages won't lie flat when opened. The reason is because the holes are punched 3/16" from the edge, so the two edges, side by side, as they would be when the book is open, add up to 3/8". This is bigger than 1/4" and therefore the two open pages will overlap each other inside the coil.I see a number of solutions for this. The easiest one would be to just not buy coils this small. The 3/8" would be the smallest to go with. I already have more of the 1/4" coils though, and I'd hate to waste them. So, here's my second solution--punch the holes closer to the edge by at least 1/16". I tried that. It worked fine. It's a bit of a hassle, but worth it so that I won't waste these other coils. There's probably an easier way, but I just added a piece of paper that was wider than my pages by 1/16" to the pages that I needed to punch and inserted that edge down into the punching slot, keeping the rest of the pages aligned at the top edge. Punch, and voila! The holes are closer to the edge.
Addendum: After giving this more thought, I've had a lightbulb moment. :-) My excuse is too many distractions due to kids! ;-) An easier way than what I mentioned would be to punch your pages as usual, then trim 1/16" to 1/8" off of that punched edge. DUH! Hopefully you have a paper trimmer that can handle this. It's those two edges that are inside the coil as you have the booklet open and lying flat that need to add up to 1/4" or less for the pages to turn correctly with this size coil--how you choose to get there is up to you.
Oh, what a task this turned out to be! Little did I know what I was getting myself into. Here is a revision of the original coil chart that I posted. This chart is specifically for 2:1 pitch double O binding wire, the kind used in the Bind It All. The sheet capacity is approximate and is based on 20 lb bond paper. The total thickness includes the thickness of the pages as well as the covers--essentially this is the thickness of the materials to be bound, plus 1/8", if that's easier to remember.
 I think this puts all of the info that I've gathered into its most useful form. I am now officially putting this topic aside, at least for now. :-)
To read my other posts about the Bind It All, including some tips on using 1/4" coils, just click on the Bind It All label below.
I'd been wondering about the thickness of cardstock vs text weight paper. That question has come up again with regard to the Bind It All. I'd posted a chart that gave the approximate sheet capacity for a given coil size. That was for text weight paper. What about cardstock though? I decided to try to look this up. Whoa. What a can of worms!Okay, so really be able to discuss this somewhat intelligently, you have to understand that papers have different weights. The weight of a particular paper is based on the weight of a ream of that paper IN ITS STANDARD SIZE. I emphasized that last part because, naturally, different papers have different standard sizes. No-o-o, they couldn't just go by the nice 8 1/2 inches by 11 inches that we often buy at the store. The good news is that the weights of papers are usually printed right on the package, so we really don't need to know what the standard size for a particular paper is at all.
Now, armed with that info, I found a chart that compared the weights of various papers and their thicknesses. Yes! The thickness is really what will determine what the sheet capacity of the coils will be for papers other than text weight paper, eh?Here's the link for the charts: Paper Weight - Thickness GuideI looked that over and determined that my typical text weight paper is about 0.0048 inches thick. Now how that will compare with some other heavier paper will, of course, depend on the weight of that paper. I could be really precise, but it's Saturday, I really just want a ballpark figure, and I have no desire to get into any complicated math. ;-) To me, it looks like my cardstock will fall in the range of 0.0090-0.0096 inches in thickness. Basically, that's twice as thick. Close enough for me! Now I haven't pulled out my text paper and cardstock and placed them side by side in piles to compare, but I might. This was just one way of trying to figure out what size coil I might need to bind a particular project. Oh, and while I'm thinking about it, I believe that chipboard is also measured by its thickness, so if you want to use chipboard pages you could do some math and come up with the coil size that you need, too.
Hope that was helpful and not too confusing. :-)
ETA: Please also see my more recent post about this: Coil Binding Chart - revised, which now includes the thickness attribute.
I found a chart that gives approximate sheet capacity for the various sizes of 2:1 pitch double loop binding wire. I thought this was useful when considering what size coil to use for a project. I purchased my Bind It All at Bonnie's Best. I bought my 5/8" coils there, too. She has great customer service and very quick shipping. I was thrilled to see that she now stocks several more sizes of the coils for this machine and in white as well as black. I think I may have to get some of those smaller coils!
ETA: Please note that I have revised this chart. Please see post: Coil Binding Chart - revised, if you arrived here via a direct link.
Here are more details and pics of the Bind It All. This machine is metal and plastic. The plastic parts feel very sturdy. In the above pic, you can get an idea of the size of its footprint and its height.
 In the above photo, you can see the slot where you insert the material to be punched. The rectangles on either side of the slot show the position of the rectangular holes that will be punched, making it easy to line things up. I fit 24 pages of text weight paper into this slot. That was probably the maximum number.This next pic shows the foot that can be extended when using the machine. This keeps it from tipping over when punching or binding.
 Here is another view, showing how the foot balances the movement of the lever when it's depressed.
 There is a setting which allows you to make continuous punches, that is, punch evenly spaced holes in longer items, also settings for punching covers, inside pages, and more free-form type punching.
 Here you can see the plastic tags that depict the various sizes of the coils. The one in my booklet below is 5/8" and matches up with that 5/8", or 16mm, tag.
 These can also be used to adjust the setting for the binding side of the machine. You just turn the knob indicated by the arrow until the appropriate plastic tag fits securely in the space as I've shown below. That will be the correct setting for that size coil. This is much easier than trying to eyeball it according to the lines on the machine. Ask me how I know. ;-)
 So, place the open coil through the holes in the project, as shown. The covers go at the back with the inner pages at the front. Hang on. Let me be more specific. Assemble your booklet. Now, holding it facing you with everything in its proper order, take the booklet and flip the back cover onto the front as if it was already bound. Now flip the booklet again. You should be looking at the back of the last page of your book, and the holes should be on the right hand side. Poke the pointy ends of the coils through the holes from the top side, going down and through. It should look like the photo below with that blank page of mine being the last page of my book. This set-up will bind the book correctly.
 Place the coil open side down into the binding side of the machine as shown below. By the way, the coils come in 11" lengths and can be cut down to the correct size with regular wire cutters. They also come splayed open as seen in the photos.
 Push the lever down and close the coil. It will look like it's pinching it too hard, but the coil will spring back a bit and be closed correctly.
 The great thing is that these coils will let a booklet open completely flat. And yes, I punched the holes in the CD covers using the Bind It All. I wouldn't say that it was effortless like it is with chipboard or paper, but it worked fine.
 Now, as for these coils, I've found that they go by a couple of different names. I've seen them called double loop binding wire or duo wire. The important thing to know is that you'll want the type with 2:1 pitch (2 holes per inch) for this machine.
And lastly, I tested whether the coil could be closed again if it was pried open, for those folks interested in knowing whether changes could be made to a booklet at a later date. I used a couple of craft sticks threaded through the coil and pulled them in opposite directions to make a uniform opening. I made just enough space to remove the contents, as I would if I were replacing or adding pages to the booklet. I then reinserted this same coil and clamped it in the binding machine. It worked. I think it'd be important to try to keep the gaps of the coil fairly uniform over its length though, otherwise it may not close the rings evenly.
Hope that this information was useful!
I'd been waiting for the smaller coils for my Bind-it-all to arrive. Naturally they came late last week and I didn't have time to play with them until yesterday. I finished the booklet today. I really like the look of these smaller coils with smaller items. The covers of this booklet are blank coasters. The machine cut through them with no problem. It also cut through about 24 pages of text weight paper with a little effort. Next time I'll do them in a couple of batches, just to make it easier on myself and the machine. The crown and friends images are by Inkadinkado and the bugs are by Technique Tuesday. For the background I used my dusters and chalk ink over punchinella. The coil size is 5/8. The embellishment is a Prima hydrangea. This machine is a lot of fun!
Happiness is having fun toys to play with. Last week I ordered the Bind It All from Bonnie's Best. She really is the best. I had that machine in my hands two days later! It punches the rectangular holes for the coil and it bends the open coil closed, too. The best part is that it's all effortless. I made a booklet with it this morning. I could have used a smaller size coil, but they're not here yet, so this one looks a little big for the project. I couldn't wait though! The covers are chipboard covered with Basic Grey's Scarlet's Letter paper. The sentiment is by Cornish Heritage Farms. The embellishments are a green cardstock strip embossed with the Cuttlebug stylized flowers embossing folder and a transparency colored with chalk ink and cut out with a Quickutz tag die that I embossed with a Cuttlebug butterfly embossing folder. The wing accents are Glaze pen.
Oh, this machine opens up a world of possibilities, especially having two girls who often need things created at the last minute! LOL!


 My scrap transparency just happened to be close to the width of the BIA. I marked the edges with black Sharpie so that they showed up better. That's what the arrows are pointing to. I was confident that I could reliably place this in the machine in the same position time and again. If you're not so sure, make yours the exact width of the machine.


