I decided to work on something besides cards. Still involved stamping, but I was ready for a change of pace. I don't recall now where I originally heard of this idea, but I remember liking it and thinking that it had possibilities. These are post-it holders, but the kind that you could keep on a desk. I was browsing through Michael's the other day. Their frames were on sale. The acrylic kind that can be a lot of fun were included, so I picked up a few 5 x 7 landscape frames. I didn't have any of those. Here are a couple of examples of what I ended up making with them.... As I said, these are acrylic frames with the stamped designs in place of a photo and a post-it type notepad attached to the front. They're incredibly quick and easy to make.
 For this one used Hero Arts sentiment stamps and a Posh pansy stamp. I used markers, direct to rubber, for the pansy, gave it a light spritz and stamped the image. There are also some Autumn Leaves Rhonna Farrer flowers stamped in the background in Versamark.
 This holder has the cyclist by Stampington, a Vap stamp "fun in the sun" sentiment, and the "remember" is by Ma Vinci.To give you a better idea of how the frame works to support the post-it pad, here's a view from the side....
 Put the stamped cardstock in upside down, or opposite of the way you'd normally insert a photo, and then lay the frame down on its back. It's best to keep the design fairly simple. The frame can only accommodate so many layers of thickness. I also found out that even eyelets that have been set fairly flat will not fit, no matter what you do. If you noticed that I managed to use a couple of big ones near the 'remember', that's because the acrylic backing ends before it gets to that point--there's about an inch of leeway.
This is a fun and easy project and you just may have most of the supplies that you need already. :-)
Yes! It's another great theme this week at Wednesday Stamper. I decided to break out a couple of old techniques for this.This first card uses polished stone on vellum for Mona's background. All of the stamps are from Ma Vinci's Reliquary. For the second card, I applied ink to a used dryer sheet (like a faux mulberry technique) and adhered it to the back of a transparency to give some texture to the background. I stamped Mona on the front using Stazon.
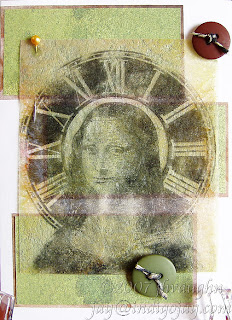 It's such fun to use Mona images!
 I'm on a roll! This is my second card for the weekly theme at Wednesday Stamper. This week's theme is faux postage and it's a fun one! The background stamps are all by Ma Vinci and the buffalo stamp is by Sutter Enterprises. I used the Cuttlebug script A2 embossing folder to accent the DCWV textured paper.


