I'd like to mention here at the start that I didn't come up with the idea of modifying these folders this way. I'd read about and commiserated with folks who were trying to figure out how best to use these small Cuttlebug folders. This is just my take on a way to make these folders more versatile. Here are the supplies that I used. My paper cutter, cutting mat, A2 size card, transparency, small Cuttlebug folders, Tombow multi-purpose glue, and Fiskars fingertip cutter. Not pictured in the photo below due to oversight, my Scor-It. Oops! You'll see it in several shots later though. It makes a wonderful backdrop for taking photos besides being a super scoring tool. :-) One idea that interested me was cutting the folder apart. That way the design could be placed anywhere on a card front. As you can see below, even on an A2 size card, placement of the embossed design can be limited. Don't think about putting it in the center. You can't.
 If you cut the folder open, you can do it though. So, I took my set of Stitched Circles to serve as illustration. First I did a CB folder no-no and opened that folder as far as it would go. I wanted the hinged part to bend back and away from the inside of the folder. Then I worked that plastic hinge back and forth a few times. One snapped on its own. For the others I used my craft knife, cutting from the inside. I mention this because I didn't want to leave any rough edges on the inside of the folder that might show up when embossing. You could always trim or file them, but I like easy.
 The next problem was coming up with a way to have these two separate pieces meet up the way that they're supposed to. I try to eliminate the guesswork when possible and make things more foolproof. This step had me stumped for a while until I saw someone mention acetate, like the kind used with Sizzix folders. Aha! Now we're getting somewhere!
 Up above are four 2" by 11 1/4" strips of transparency. These are cut from a heavier weight transparency. They used to be a GBC Clear Presentation Cover. The ever-resourceful and very creative Sue Nelson of Heart Prints found these a while back. They're wonderful for making gift boxes and are a great weight for making transparent cards. I found these at an office supply store. I used them here because I wanted something fairly sturdy that would bring the two sides back together properly. The 2" dimension is the width of a CB folder. I just went with the transparency's original length.
 Up above you can see the score that I made with my Scor-It at the halfway point of each strip. If this was cardstock I'd have folded the card so that the opening was away from me, but I just went ahead and folded the two ends toward me. It just seemed to work better. Those are now ready to go.
 Okay, so I cut all of the folders open. I laid them so that the insides of the folders, the embossing surfaces, were face down. I placed a small dab of the Tombow multipurpose glue at the corners and smeared it around. I wanted something that wasn't necessarily going to be permanent. I also wanted something that would be fairly flat so that it wouldn't cause any problems with embossing. I let it dry until clear. It just took a minute or two.
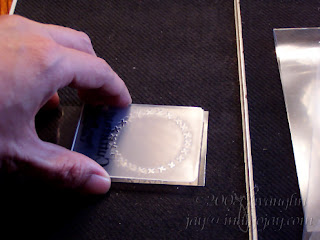 Here I've opened up one of my folded transparencies and I'm placing the side with the glue down onto the transparency at the edge opposite the fold.
 With the folder still open and the first side in place, I placed the other half of the embossing folder on top of the first so that it would be just where it needed to go when embossing. I then let the other free side of the transparency close on top of that and pressed down gently on the corners so that the glue would stick.
 And there's my finished folder.
 You can see that I can now place the design in the center of the card if I want to.
 I can center it along the folded edge.
 I had to use a different folder here to say that I can tilt my design at a diagonal if I want to and place it anywhere on the card front. Heheheh, circles don't have diagonals, eh? But that's why I left the transparency at its original length. It just maximizes the reach that the folder has, and it still positions both sides of the folder so that they'll meet properly to emboss the design.
 And here you can see that I've embossed a stitched circle at the center of the card front. There are no folder lines either. The heftier transparency does add some thickness. On my Big Shot I used Tab 2 instead of not using any tabs at all--this made my platform slightly thicker than usual when running embossing folders through my machine. But I also removed one of the clear plates, so my stack was actually thinner than usual. The embossing came through just fine though there was very little pressure applied. This is a case where less is better!
 There you see the finished folders and the example on the card. Hope this might help make those small CB folders a bit more versatile.
Here's a pdf chart that I made which compares the prices of various adhesives, including ATG tape, Glue Glider Perma Tac, Tombow tape runner, Duck, and a few others. Yeah, these brilliant ideas always occur to me after I've already been wordy. You'll need Adobe Reader to view it. You probably know the drill. :-) I highlighted the column that makes it easiest to compare, that is, the one showing the amount of adhesive that you get per dollar spent. http://www.indigojay.com/crafting/adhesive_comparison.pdfThis isn't an exhaustive list and isn't meant to be. I also tried to find competitive prices, but I didn't scour the net for the absolute best bargain either. I just wanted to get some ballpark figures for the sake of comparison when considering buying an ATG. And of course if you want to see the rest of the reasons why I like my ATG, just read the post that I made a bit earlier this evening. :-)
Okay, it's spring break over here, so I've been spending some time shopping with my girls rather than crafting this week. I was browsing one of my favorite sites earlier though and in response to a poll, I decided to make a quick post here comparing adhesives. I've been a fan of my ATG since I bought it. When I'd been researching, the numbers had convinced me. Here's what they are now in a nutshell....Tombow permanent refill 472" (~13 yds) $2.99 USDDuck 4 pack 335"/dispenser (~9 yds ea or ~36 yds total) $9.00 USDScotch double-sided tape roll for dispenser 900" (~25 yds) $4.00 USD3M gold acid-free 1/4" width ATG transfer tape 36 yds $3.00 USDSo, of some of the more popular adhesives, the ATG tape was the least expensive, sometimes by a considerable amount. There is an initial outlay of $35-38.00 USD for the gun itself. The numbers convinced me that it would pay for itself before long though.Other pluses....
~*~ATG tape is very sticky and will hold heavy and/or textured cardstock or embellishments in place easily. No failures over time.~*~ATG tape holds ribbon down nicely. For this reason I really like the 1/4" tape! If I need 1/2" for some reason, I just make two passes. I don't do that often. Don't need to.~*~If the tape should break for some reason, it's easy to rethread it and the rest of the tape is not a total loss as with some other dispensers, and isn't THAT frustrating! Been there, done that.~*~I never misplace my ATG--yeah, it's big. :-)~*~Since I mentioned the size, I need to say that it's very light and well-balanced--hey, framers have been using this gun for years! I find it very easy to use. So do my girls. Even my lefty.~*~It's fun to alter your ATG.~*~It's easy to load--note that there is a handy diagram inside the gun that shows exactly how the tape should be threaded--very helpful since you don't load it often.
~*~I don't have to throw out a plastic dispenser every time I run out of adhesive, so less waste and that's a good thing.
~*~Less time spent looking for a new dispenser or refill when tape runs out in the middle of a project because it takes quite a while to work through 36 yards of adhesive.
I bought my ATG at framing supplies. I've never had a problem with my ATG or with the customer service at that site. I've ordered and reordered ATG refills from them a number of times. That said, I've heard of folks having problems with their ATGs since the beginning of the calendar year--something to do with the uptake wheel not functioning properly. It seems that framing supplies has not been helpful. BOO! :-( On the positive side, 3M is standing behind their product and calls made directly to them have resulted in prompt and very satisfactory resolution of problems along these lines. Gotta like that! Hooray for them!So that's my quickie adhesive comparison and the reasoning behind my ATG purchase. I've not regretted it. :-)
Addendum: I bought my ATG long before the Glue Arts Glue Glider Max was released. The refill for that is a cartridge that you just drop in the gun. From what I understand, the refill holds 2 more yards of adhesive than the ATG but costs a whopping $15.99 USD! I've also heard of some initial problems with the tape breaking. Yikes! Very pricey if you have the bad luck to have one break, eh? Plus there's that added waste to be tossed out for what for me would be minimal added convenience.
Another addendum: Another place that stocks the 3M ATG is the Armel Company. I've heard good things about this place at some of the discussion forums at 2 Peas in a Bucket. I've not purchased from them myself, but it sounds like it would be a reasonable place to check out since framing supplies' customer service seems to be letting folks down. I think it's good to have alternatives. :-)


 Here I've opened up one of my folded transparencies and I'm placing the side with the glue down onto the transparency at the edge opposite the fold.


