Showing posts with label ATCs. Show all posts

Wednesday, February 13, 2008

Valentine - Wednesday Stamper

It's a celebration of Valentine's Day on Wednesday Stamper. The challenge for this week is to create something Valentine related.


This started out as a full-size card, but I didn't care for the way it turned out. I did like parts of it though, so I took those parts and made an ATC instead. This is a polished stone background stamped with a Cornish Heritage Farm image and embellished with a Fiskars border punch, the Textile texture Cuttlebug embossing folder, and of course, a heart.

Tuesday, September 04, 2007

Alternative to coloring

I made an ATC today, inspired by the challenge theme on Think Monday Think ATC. The theme is men. It had been a while since I'd made ATCs. I also have very few stamps of men. I came across one, though, as I was cleaning up my space, and it got the wheels in my head turning. Here's what I came up with.


This is an image by InkaStamps. The thought of coloring this with all of the detail was a bit intimidating. Then I thought of a technique that I'd used recently. It's called alcohol splash. It's very easy. Get out your glossy paper and alcohol inks--I used Ranger; choose two or three colors that go well together--I used red pepper, butterscotch, and mushroom; and drip the colors onto the paper, taking care not to mix too much and muddy the colors. I sped up the drying process with my heat gun, then stamped the image using Brilliance black ink. I heat set the image and cut it out, then mounted it using pop dots over vellum, Basic Grey Infuse, and Bazzill raven black card stock. I thought it was a neat way to color the image without actually having to color it.

Monday, July 30, 2007

Another virtual ATC

I started working on this one last night. The edges could have been cleaner, but again, this was experimenting on my part, so I wasn't too concerned about making everything perfect.


This is essentially a collage of some of my digital photos. I put them together using Paint Shop Pro XI and added a canvas texture to the background. I make these the traditional 3 1/2 by 2 1/2 inch size of ATCs and use a resolution that will allow them to be printable at that size.

Sunday, July 29, 2007

A new twist

I was browsing some of my Yahoo Group emails when a couple of words jumped out at me. The words were digital ATC. I started out with an interest in computer graphics before I became more involved with stamping, so this intrigued me. Now I can see getting very creative with this, but I just wanted to dabble first. I have loads of digital kits from when I was experimenting with digital scrapping. These elements would make for a quick and easy ATC.


The digital papers and elements are from Jen Wilson's Java Jive kit. I put them together using Paint Shop Pro version XI.

I can see getting very creative with this. There are so many possibilities for blending images and colors, for collage, and for working with layers to bring about fun effects. It's a new twist on traditional cards and graphics.

Tuesday, February 20, 2007

Transparency textures

I made a couple of cards this morning using transparencies that I'd run through my Big Shot inside a couple of Cuttlebug A2 embossing folders.

This first card is an ATC with the mesh textured transparency giving some added dimension to the center of the Ellison die cut sunflower. The sentiment is by Stamping Sensations.


The main image of the second card is by Scottish Borders Stamping and is colored with twinkling H2Os. I layered a transparency with the bubbles texture on top of it and attached it with eyelets at the corners. The fun part about this was that the transparency was a bit warped after going through the Big Shot. It added some great dimension though, which is why I only attached it at the corners. The sentiment is by Hero Arts.

Thursday, February 15, 2007

Footwear - Wednesday Stamper

What a fun theme for this week's Wednesday Stamper--FOOTWEAR! I love it. I made a card and an ATC.

The card uses See D's stamps by Sugarloaf. I cut out the shoe shapes, embossed them with Spellbinders texture plates in my Big Shot, and brushed them with chalk ink Cat's eye inkpads. The shoe sentiment is by Stampabilities.


For the ATC, I stamped part of a Dolly Mama's stamp image by Stamps Happen for the background and colored parts of it with Sakura Glaze pens. The tag was stamped with part of a Stampabilities stamp and also colored with Glaze pens, then attached with an Around the Block tagger tail.


Thanks for looking!

Wednesday, January 31, 2007

Think Pink - Wednesday Stamper

Pink is not a color that I use very often. For whatever reason, it's just not one of my favorites. So, when I saw that this week's Wednesday Stamper theme was to Think Pink, I was happy about it because it was going to make me think outside of my usual box.

This first card is a collage of images by Club Stamp (lighter gray ink) and Art by Moonlight. The ART stamped underneath the clear pebble is by Ma Vinci.

This second card uses stamps by Non Sequitur. I used twinkling H2Os on pink cardstock and stamped the images on top in black ink. My embellishments are Prima leaves painted with those same twinkling H2Os. There's a bit more sparkle to this in real life. You get a good idea of the shimmer from the leaves. This new set of H2Os had been sitting on my craft table for a while. It was great to get a chance to use them.

This last card is a quick ATC that I did this morning using some pink patterned paper that I had left over from another project. The stamps are all by InkaStamps.

Wednesday, November 29, 2006

More examples using the Big Shot

I just wanted to post a couple of ATCs that I made using various dies and embossing folders in the Big Shot. It's great to be able to use stuff from just about any manufacturer.

Blue Christmas

To make this Blue Christmas ATC, I used a Quikutz wafer die for the snowman and his hat. I colored some of the pieces with Sharpies and added some sparkle with a Stardust pen. His background was made by running some Colorbok Christmas patterned paper through my Big Shot with the Cuttlebug d'vine swirl embossing folder. The impression was very crisp! I used EK Success corner punches, a Rubber Soul sentiment, and a large patterned snowflake brad to complete this ATC.

Plaid Christmas

I love the look of the Cuttlebug swirls! I couldn't resist using them again for this ATC. This time I used it on plaid paper as a background for a Christmas tree die cut that I found at Target. The sentiment is by Rubber Soul and is accented by a dot of green Stickles.

I just wanted to show some of the things that I've been able to do with my Big Shot. So far it's done everything that I've wanted it to do. Can't wait until tomorrow when I can play with it a bit more.

Saturday, September 02, 2006

Snowflakes

No, not real snowflakes. It's been cooler here, but not THAT cool. I'm talking about snowflakes on an ATC. This time I wanted to try out the Ellison Cut 'n' Emboss dies. I used them to make the two large snowflakes, which were cut from Bazzill luster metallic paper. I also used the Bazzill for the base. There's a lot more shimmer to this ATC in real life. I'd used Brilliance Starlight black ink for the stamped flakes, which are by Inka Stamps, so those have more shimmer to them, too.

Snowflakes ATC

I have to say that I like the detail in these Ellison dies. They cut quickly and easily in my Sidekick, too.

Thursday, August 31, 2006

Ooh la la!

This was a quick, fun ATC. The theme for this swap was Around the World, meaning that participants were to choose a city or place in the world and depict it. I'd happened to receive these two stamp images in an Oh Domino! grab bag recently. I thought that they worked nicely for this theme. The sentiment is by A Muse Artstamps.

Ooh la la!

I have a few other works in progress, but nothing else to share yet. I spent today doing some shopping at a couple of LSSs. I bought some fun papers, a couple of Lockhart stamps (Love the vegetable couture line!), and a sheet of unmounteds by Club Stamp. I've also been working on organizing my craft space--it's an ongoing battle, but I'm making progress.

Monday, August 28, 2006

Vintage ATC

I signed up for a vintage ATC swap because it isn't my typical style and I wanted to give it a try. I had a sheet of rubber from Olive Wimple that hadn't seen ink yet, so I thought this would be perfect. When I came across a challenge to use lace, it fit right in. Here's that ATC.

Vintage Lace ATC

The patterned, textured paper is DCWV Old World. This is rapidly becoming one of my favorite lines of paper. The stamped image is Olive Wimple. The lace is lace binding threaded through a cameo charm. It's all mounted on black cardstock edged with a gold pen.

Wednesday, August 23, 2006

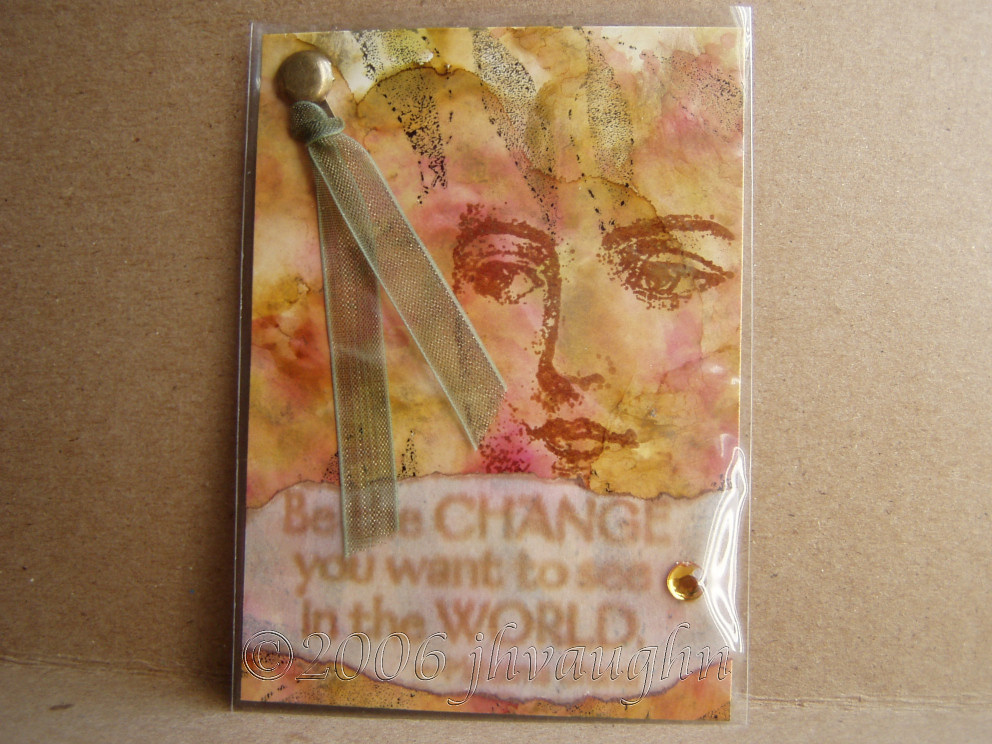
Polished stone

Be the Change

This is an ATC that I put the finishing touches on today. I made it for a Hodge Podge swap--ATCs that will be made using a variety of techniques. The technique that I used is polished stone. I love this technique! It's quick and easy, even though it looks like it might be hard to do. I use glossy paper. I've found out (the hard way) that there IS a difference when it comes to glossy paper. Glossy paper for photos does not measure up to glossy paper that you get from your local stamping or scrapbooking store. The real thing lets you move the inks around and blend them together. Glossy photo paper doesn't give the same kind of look at all. That's my first tip.

Next, I use a felt applicator. You don't have to buy one. You can improvise. I've used an empty plastic medicine bottle before. I stuck the hooked part of some velcro on the lid and attached my square of felt to that. I kept the extra squares inside the bottle. It worked great! I think it's important to use felt though. You can try cotton balls or paper towels, but too much of the ink gets absorbed, rather than getting onto the paper, which is where you want it to be. I guess that'd be tip number two.

The ink that I like to use is alcohol ink. Some people have used dye inks and reinkers. It's almost the same, but again, I feel like the ink moves and blends better when I use alcohol ink. I have some Studio 2 inks, but mostly I use Ranger inks because I love the colors!

To get to the nitty gritty, I get out my supplies then I choose three ink colors. For my ATC up above, I used Cranberry, Butterscotch, and Lettuce. I put several drops of each next to eachother on the felt applicator. I also add some of Ranger's gold mixative, but you can also use a Krylon gold leafing pen and dab it directly on your paper in several spots. The effect will be almost the same. If I'm doing a large area, or if I want my colors to be a bit muted, I'll also add some of Ranger's blending solution to the felt. The substitute for this would be denatured alcohol. Usually something a little stronger than just rubbing alcohol is needed to get the inks moving around.

Once I have all of that in place, I start pouncing the applicator onto the paper. I turn and twist it so that I don't get a repetitive pattern and sometimes I go back over the same areas or leave some of the white showing through. You should start seeing the colors blend though and the gold leaf or mixative will move with the inks and look like veins in your stone. That's it! When you're finished you can buff it a little with a tissue, but it should shiny and marbled.

This is a great technique for backgrounds, and that's probably my favorite way to use it. In the ATC up above I did this technique on an 8 1/2 x 11 inch piece of paper, cut it into ATC size pieces, and stamped on them using permanent dye inks. I've also used polished stone for making die cuts or to add a bit of an accent on a card or layout. This is a fun and easy technique and can look quite elegant. Give it a try!

Friday, August 18, 2006

Stamp-a-rama!

Today I finished up the last of 8 ATCs for a stamp-a-rama. In a stamp-a-rama, each participant sends in images stamped in permanent black ink or embossed in black. Each person gets back one image from each of the other people in the swap. They then color, cut, embellish, basically do whatever they want to the images, but they have to make them into ATCs, which are sent back to the hostess. When all is said and done, each person gets back the images that they originally sent in, but they've been turned into works of art by the other swappers. It's a great way to get new ideas for old stamp images, or for those images that have you stumped!

Here are the ones that I worked on. The original images were: the seahorse, the single sunflower in the center of the ATC, the dog with its bone, the heron image, the silhouette of the woman at the mailbox, the water pump and bucket image, the RV, and the flying queen.

Stamp-a-rama ATCs

I had fun with these. Some of them are images that I don't normally work with and wouldn't usually buy. These stamp-a-ramas are a fun way to stretch a bit. I used a little bit of everything here--punchinella, die cuts, puffy paint, mulberry, ribbon, embossing punch, metallic rub-ons, crimper, transparency, and other embellishments like the Primas, the bottle cap and the photo turn and metal corner. I used colored pencils, markers, chalks, water color pencils, stamps and stamping ink. I even managed to do some doodling. Can't wait to see what I get back.

Wednesday, August 16, 2006

Another first

I admit it. I can be slow sometimes. Most of the time I'm right in there checking out new tools, new techniques, and all of that kind of thing. For some reason though, I never jumped on the Asian art bandwagon. Actually, I think the bandwagon left me in the dust. Today that changed. I made my first Asian card. I'd signed up to do an ATC swap with this theme. This is what I came up with.

Asian Imagine

The textured, patterned cardstock is by DCWV. The stamps are all from Inka Stamps. I enjoyed making this ATC. Good thing! I've signed up for an altered rolodex card swap with an oriental theme that's due next month.

Monday, August 14, 2006

The day after

To pick up where I left off yesterday, I put my faerie ATC aside and didn't look at it again until this morning. I pulled off the vellum, but couldn't come up with a good way to cover up or disguise the holes from the staples. I finally decided that the staples would stay, and this is what I came up with.


faeries ATC revised

I think I like it. :-)

Sunday, August 13, 2006

A little distance

I often find that when I make something, it will be missing that little something that gives it impact. Many times I don't know what that something is, as I'm staring at it and willing it to come to mind. I have a list by my table. It's a list of ways to embellish or accent cards or ATCs. Sometimes I can find the answer there. Often I find that I just need to stop staring at my piece and give myself some distance. So, I'll put it aside and look at it again the next day or a couple of days later. Usually I'll be struck by some sort of inspiration.

This ATC is an example of what I'm talking about. It's a themed ATC--faeries, for an ATC swap using stamps from Scottish Borders Stamping. This came from a neat sheet of rubber images, by the way. The finishing touch was the Stickles glitter. I liked the sparkly cardstock--metallic Bazzill. I'd used Brilliance pearlescent inks for the faeries and for the text on the vellum. It was missing that special something. After I added the Stickles, it felt finished.


faeries

So here's to a little distance and finding those finishing touches. Although now I'm thinking that it might look better without the text, if I can figure out a way to disguise the staple holes. I think I'll decide tomorrow.

Thursday, August 10, 2006

Back in the groove

Well, I'm another year older as of a couple of days ago, and today was a day of getting the girls ready to go back to school in a couple of weeks. I'm happy to say that I managed to get to some swaps, even with all of this going on.

After my adventures with scribbling, I was a little apprehensive about the doodling rolodex swap that I'd signed up for. I'm happy to say that the doodling went much more smoothly. I'd never really doodled on any of my ATCs or cards before. This was new to me. I pulled out my calligraphy pens though and decided to doodle some swirls on the front of my rolodex card. This is how it turned out.

doodling rolodex

The next swap that I tackled was a no layer ATC swap. I've participated in one of these before. It was a lot of fun. I did faux layers on that one. For this one I used torn masking tape over the sentiment and stippled some Fresco ink for the background. I stamped the shoe images on top. Simple design, but I think less is more.

no layer shoes

This last ATC is part of a set that I did, just playing with some dollar stamps from Michael's in anticipation of a swap using some of these dollar stamps. This one was very simple, but I liked it.

thinking of you dollar stamp

Wouldn't you know it? I start getting caught up with swapping and I find myself signing up for more! But as long as this stays fun, I'll keep on doing it.

Wednesday, August 02, 2006

On a Roll....

Ah, it's August and it feels every bit like summer here in St Louis, hot and humid! The great news is that my craft area is in the basement where it's cool and dry. I love it! I also love that I've been able to work on some of my swaps these last couple of days.

The first one that I worked on was an ATC swap with a sunflower theme. That was right up my alley. I have lots of sunflower stamps. They're probably second in number only to my dragonfly stamps. I used a Posh sunflower stamp and my Marvy markers for this one--direct to rubber, spritzed with water and stamped. The sentiment was stamped on vellum, and I have to say that I like these Glue Dots vellum adhesive sheets. The glue dots are so tiny that you really can't see them! I'm impressed. I also fell back on an old technique. I'd distressed the edges, but the card still looked too plain in the upper left corner. I couldn't think of what to put there, when it occurred to me to add to the distressed look . I pulled out one of my splatter stamps and stamped in the upper and lower corners. It felt more complete to me after that.

Sunflower Day

The second ATC that I did was for a floral/garden swap, which had to include a quote. I love gardening, so coming up with a quote wasn't too hard. Finding one that would fit nicely on an ATC was a little trickier, but it worked out fine. The sentiment was from Designs Ink'd and the thistle from Just For Fun.

Earth Laughs

Altered rolodex cards are new to me. I'd only done one before, so when the opportunity to do more of them came up, I signed up. The theme for this was rainy day quotes. The dancers were done with a Judikins stamp in Versamark. The umbrella is Designs Ink'd in Versafine inks. The sentiment is by Time to Stamp. This was also my first try at faux stitching. I used a paper piercer and my black/gray Souffle pen to try to give it a more 3D effect.

Rainy Day

I have a bit more to say about how I assembled my rolodex, but I'll save that for the next installment.

Sunday, July 30, 2006

Return of the Muse

My muse returned the other day. It felt good to finally crank something out. This was just a simple card with a classic design and sentiment. The flower is a Prima hydrangea. The ribbon is actually a find from the bargain bin at Michael's. The papers were scraps from my scrap drawer. I thought it came together nicely. It was also fun because I got to send it to my best friend.

On a different note, I'd signed up for an ATC swap that I'd thought was going to be interesting, but easy. It ended up being far from easy. I found out that I was scribbling-challenged! It had sounded simple enough--take a black marker, scribble on some white cardstock, cut it into ATC-size pieces and turn whatever shapes that you see on that piece into your design. I think I have a good imagination. This was going to be fun! Several sheets of cardstock later, I was beginning to panic. It wasn't nearly as easy as I thought it'd be. I set it aside, at times for days. I'd look at the images again and see NO potential! I won't even admit how many sheets of cardstock were sacrificed in this endeavor. I'd come up with maybe 2 or 3 usable ideas. I needed at least that many more. As the deadline closed in, I sat at my table again and decided to try scribbling one more time. This time, however, I just put the sheet on the tabletop, took marker in hand, closed my eyes, and scribbled. Interesting! I cut it up. NOW I had something to work with! I'd figured out the problem. I was being too careful with my scribbling. I'd been taking care to cover the page evenly, or I'd been making too many perfect loops, or adding lines or circles or zigzags. When I closed my eyes and just scribbled, I wound up with unique shapes and designs. Here are a couple of examples.

This first one came from my pile of initial tries. I like it, but you can see that there was a lot of symmetry and looping to it. I think I'd been trying too hard.

Night Spirit

These are from the last piece of cardstock that I finally scribbled in freeform fashion. Once I got the "designs" on paper, the rest of the creating was fun!

Party Dress

Sock Puppet Theater

What a learning experience that was! It was great fun though.
Posted by Picasa

Saturday, July 22, 2006

Saturday afternoon musings

Most of the day is gone and I haven't crafted yet. This morning I watched part of the Tour, enough to see that Floyd did claim the yellow jersey and should go on to win tomorrow in Paris. Very cool.

But to talk about stamping, my latest obsession has been with making ATCs, Artist Trading Cards, for anyone not familiar with the abbreviation. There's something about the small scale canvas that appeals to me. I'd been a dedicated card maker until a few months ago. I didn't really understand the appeal of ATCs at all. Then I made one for a Time to Stamp swap, and I was hooked! I've joined all sorts of ATC swaps since. Scottish Borders Stamping has monthly themes. Joyce even chose one of my ATCs to grace the Yahoo group homepage a couple of months ago. That was fun! Here is that ATC.


Some of the detail was lost in translation. This was made using only SBS stamps. The background was done using the polished stone technique and Ranger alcohol inks, with the image later stamped in black dye ink. I like the look of the glassine envelope. It mutes the thistle image just a bit without obscuring it completely. I've made scads of ATCs since putting this one together, but it's still one of my favorites. To read more about ATCs, the Art in Your Pocket site is a great place to start. It has lots of information and plenty of links to other sites, too. There's such a wide range of possibilities when it comes to creating ATCs. Then there's the fun of trading them and seeing what others are doing, too. I've been trading since April and I've already expanded to a second binder to hold my collection. It really is great fun!

LinkWithin

Blog Widget by LinkWithin