Monday, September 06, 2010

Cuttlebug embossing plus

When I first heard about this product, I was intrigued. These folders sounded a lot like the embosslits by Sizzix and I wondered what Provo Craft would do differently. After playing with a couple for just a bit, I now have a better idea.


Here are a couple of the CB emboss plus folders as they'd arrived after I ordered them. The larger one is the 5 X 7 Brocade Window. The smaller one is the Elegant Ellipse.


Removing the folder from the packaging takes a bit of care. Don't tear or cut any of the plastic. The clear plastic makes up the outside of the folder, just like in the home-made embossing folders that I've described here on the blog, and like the modified CB folders that I described here. All you need to do is unsnap those two pairs of green buttons and slip the folder out from under the cardboard flap.


This is the folder once it's been removed from the packaging. This is the front view.


This is the folder opened up. The green parts that you see are thin metal dies that do the cutting and embossing.


If you flip the folder over and look carefully at it from the back, you'll see that there's a flap that's been cut out of the plastic. This flap can be lifted out of the way so that this side of the folder can be used as a stencil. Clever! This is a plus over the Sizzix embosslits.


The smaller folder works exactly the same way.


This is the back. You can see that there's a rectangle outlining the design of the embossing folder. That's the outline of the flap that I was talking about up above.


Here I'm lifting the flap away. It can be tough to see if you don't know what to look for.


Okay. So let's see how these actually work. I like the minimal packaging. Here you see the back of it. They show how to run the folder through, use it as a stencil, and use it as a die. Wonder why they didn't say what the stack should be though? Seems like a big oversight. For CB users, I've read that it's the A plate, then the folder between the two B plates. As usual, we Big Shot users will get to experiment. :-)


So, I have a nice big folder, let's try a nice big card. I think you can see that I already have a dilemma. That's a 5 X 7 inch card with the fold on the side. It's the design of the embossing folder that is 5 X 7. If I want to die cut and emboss my card front, I can't do it. The folder is too big.


See what I mean? Usually I place the card front inside the folder and wrap the rest around the back. Can't do it. The design will be way off. The other method that could work would be to put the card front inside the folder and run it through sideways. That won't work with these larger folders either. They're too wide for the opening of the machine. I've always felt that was a drawback with the larger sized folders. It cuts down on versatility. Hate that.


Here I've settled for trying this out on a half-sheet of white card stock.


This is the card stock inside the folder, sandwiched between the two clear cutting plates, on top of the multipurpose platform open with No Tabs. Roll it through. It wasn't a super tight fit in my machine. It rolled fairly easily. And don't be alarmed if you hear cracking noises as the die goes through. I've heard the same sound with the Sizzix embosslits. It's fine. Nothing is cracking.


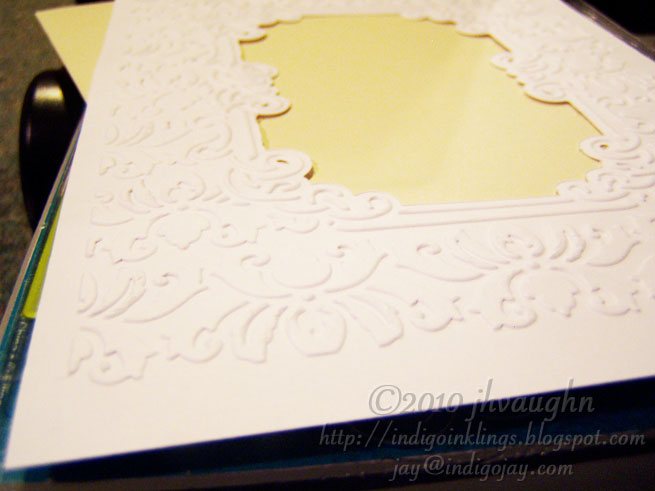
This is the folder opened up. You can see the debossed design. You can also make out where the die has cut through to make the window.


Here I've removed the center and poked out the other pieces that had been cut. It's also flipped over so that the embossed side is showing. This could now be trimmed down to fit the front of that 5 X 7 card.


I wanted to give you an idea of the quality of the embossing.


And here's a look at the debossed side. You may also be able to make out the fact that the window cuts were not perfectly clean. You can see some bits and pieces hanging on the edges of the opening. It's nothing that a bit of fine grit sandpaper can't remove, but it's an annoyance. I'm not sure if a thin shim might help eliminate this, but I'm also not sure that I want to add a shim since the fit was already fairly tight.


This is a photo with the card stock back in the folder. Again, this is a view from behind with the flap lifted so that you can use this side as a stencil to pounce chalks or inks or whatever you'd like to use to add some color to the embossed design.


Since I didn't get to emboss my card front with that bigger folder, I thought I'd give it a try with the smaller one. This is an A2 size card. I'm placing the front inside the folder and wrapping the back behind. I like that the plastic folder allows the die to reach close to the center of the card front. I used the same stack as last time. From the bottom up: multipurpose platform using no tabs, clear cutting plate, embossing folder with card front inside, clear cutting plate.


After rolling it through and again hearing some cracking noises, here's the result.


It's nicely cut and nicely embossed, but there are a couple of issues. I left the photo a bit dark up there because I wanted you to be able to see that there was some buckling of the card front below the embossed design. I'll have to play with that to see if it can be eliminated.


I left this photo dark, too, so that you can perhaps see that the top edge of the die left a crease in the card stock up above the design. That's a second annoyance to try to minimize. Just not a great look, you know?

Overall, it was a nice improvement made by Provo Craft over the embosslits by Sizzix. The construction of their folders show the thought that went into this and added some versatility. I like the fact that they can reach the center of a card front. I like that you can fully emboss the front of a 5 X 7 card edge to edge. I also like that you can use part of the die to stencil.

There are drawbacks though. I still find the larger size to be limiting (as in the folder cannot be run through these particular machines--Cuttlebug and Big Shot--sideways), and the fact that the folder itself extends beyond the design makes it problematic to emboss and die cut a card front. Then there's the pesky problem again with the creasing and the buckling of the card stock, at least with my Big Shot. I'll give it a whirl with my CB and see if the results are better. If not, it'll be time to do some tweaking unless I decide that I really like cutting and adhering layers to my card fronts.

Hope everyone is enjoying the Labo(u)r Day holiday, if you're celebrating where you are. :-)

Friday, September 03, 2010

Fiskars Continuous Stamp Wheel

I don't think it will come as a surprise to anyone who reads this blog that I'm kind of hooked on tools and gadgets. They're just so much fun! Well, we had a brand new Joann's open not too long ago. It replaced the old grungy one and was big and bright and beautiful, occupying the space that was once a Circuit City. I'd browsed through there once just to take it all in. Okay, yeah I bought some stuff, too. I'll admit it. But the last time I was there, I had a coupon that just had to be used on something. That something ended up being the Fiskars Continuous Stamp Wheel. I was curious, and with the coupon, the price was right. The original price was $9.99 USD.


So, pictured above are the Continuous Stamper and a couple of clear stamps made for use with this tool. I liked the stamps, even if the stamper might be a bust.


This is the stamper out of the packaging. It's small and lightweight. You can see the roller that the stamp will be attached to. There are also some plastic guides on the housing, front and back, (one is near the tip of my thumb) to help with aligning your design. Simple really.


Here's a view of the bottom.


And here's how the roller looks when it's been popped out by a simple push from above.


Those two orange knobs pull away from each other to unlock the roller and allow it to open up. Once open, you can see the small square hooks that hold the ends of the stamp in place. My left index finger is conveniently pointing to them.


Here you can see that holes at the end of the stamp that fit over those hooks.


Above you can see that I've attached one end.


Now I've wrapped the stamp around the roller and am attaching the other end to the hooks. There is a slightly raised edge on each side of the roller to help align the stamp.


Now the roller is closed.


This is just a view of the other side so that you can get a sense of that raised edge.


Pop that roller back into place. By the way, it takes a lot longer to explain this than to actually do it. :-)


The starter kit comes with a black ink cartridge that's shown above.


It has a couple of knobs that fit into a couple of notches. To help make sure that it's loaded correctly, one set of knobs and notches is bigger than the other, so take a good look before trying to force something that might not be lined up properly.


This is the bigger set.


Here's the smaller pair. The fan-like grooves will be what lock the cartridge in place.


Click the ink cartridge into position.


Remove the cover over the ink roller and set it aside. Don't throw it away. You use it to cover the ink again when you're finished. Rotate the cartridge to lock it into place. Now you're set!


Here's the tool all prepped and ready to go.


It's time to roll! I'd advise using your dominant hand for this. I'm using my left hand because the right one is taking pictures.


I have to say that this was easy to roll and keep straight, even left-handed. I've seen better ink coverage though.


And here's how the design looked after I made a second pass.

What do I think of this? It is a little work to set up, but I like the idea of continuously stamping and not having to reink. That's a plus over using these stamps with clear blocks. Now I didn't really prep the stamp that I used, and to be fair I should probably do that before saying the the image quality wasn't the greatest, but I have liked results better using other inks, like Versafine or Memento which tend to cover better. This system does force you to use their ink. Clean up was a little messy, too, but not bad. They recommend removing the ink cartridge and then replacing it with a damp towel and rolling on scrap paper. I just "stamped off" the ink after removing and putting away the ink cartridge. You're also limited in the colors that you can use, though they do offer several colors to choose from. I haven't had this long enough yet to know how long the ink will last.

So, for the price, I think that this tool can be very useful for its specific purpose. If I'm making a bunch of cards and using similar designs on all of them, I could see pulling this out and having it be a time-saver. Would probably be fun to stamp in multiple colors and perhaps even combine some of the designs as well. I may have to give that a try. At this point I only have the black ink though, so that'll have to wait--at least until my next trip to Joann's. :-)

Wednesday, July 21, 2010

Whoa, it's a blog-a-versary!

A cheery "Hello!" to anyone still following after my unscheduled hiatus from blogging. Life got busy, followed by a creative slump, then I had some issues with what I think was a disc problem in my neck that kept me from crafting comfortably when I start feeling that urge to create, and now we've had a busy summer filled with the usual summer activities, home improvement projects, visits to relatives.... etc. You get the picture, I'm sure. :-)

Anyway, I absolutely HAD to post since I knew that I'd started this blog back in July of 2006, never dreaming that I'd keep it going this long. I appreciate all of the messages that I've received from folks who were wondering if I'd quit blogging or who were just checking up to see if things were okay over here. Crafters are such a lovely community of people. :-)

I still haven't been crafting much lately. We've been working on my girls' "shrine" to dance. They've both danced since they were not quite three years old--they're now 13 and 15. Each year they'd dance in a recital and each year they'd have professional photos taken in costume. All of those photos had been sitting in a nice stack in a cabinet. The individual 8x10 photos are now in albums. Yay! That wasn't so bad. Finding the albums and pages for them was the toughest part.

The bigger part of the project has been tackling the group pictures. For each number that they danced in, they have a photo of the group. Early on, it was usually just one photo/year. Now that they perform in more numbers, they're in more photos. Last year they were in nine of them. So, over the course of 12 years of dance, we'd accumulated 46 photos. It seemed a shame to have them just sitting in the envelopes in the cabinet, and the girls wanted to use them to decorate their dance space in the basement where they have a mirrored wall and a dance barre.

We pulled down the old Spongebob, Barbie, and Scooby Doo posters and decided that we had a large enough space that we could put the photos in frames and somehow artfully hang them. I was excited to find that Target had those packaged pairs of very simple frames for 8x10 photos in various colors for only $6 USD. After raiding most of my local stores for those black frames, we decided that a mix of black and silver frames would be okay, since I couldn't find enough of just the black ones. Then came the labor-intensive pulling of photos, labeling the backs with songs, years, dancers' names, and placing them in the frames. I was thrilled to find that our photo collection was complete! I was sure that we'd be missing some.

But then came the hanging issue. It was going to be tricky, eh? That's a large number of photos, plus we know that we'll be adding to them. It was daunting to think of using picture hangers and trying to keep any semblance of order with that many photos--imagine just trying to hang them in straight lines or trying to keep each one straight over time. Yikes! This is when it pays to have a husband who loves woodworking and doing home improvement projects himself. He came up with a way to mount the photos in a wood framework on the wall that would still allow us to have fairly easy access to them, as needed. They slide in from the sides on a narrow ledge and are held in by a narrow lip at the top and bottom edges. All I had to do was paint all of those wooden pieces black. I think it turned out great! Much better than trying to measure and place hangers for 46 photos.


Okay, since the really astute among you would probably notice that there are only 42 photos displayed, we do have another partial row to put up. Just haven't gotten to that yet.

So, no cards and no nifty tricks or tips for using embossing folders or any other tools today. I do have some of the new stuff and want to play with it. When I do, I'll post results. Just thought that I'd show you a crafting project of sorts that we'd been working on here at home. :-) And YES! It's a happy celebration of four years of IndigoInklings, even if the posting can be sporadic at times. Thanks for hanging in there with me! :-)

Friday, March 05, 2010

glittered embossing

Every once in a while I like to add some glitz to my cards. I tend not to use glitter all that often because it can be so messy. That's why I tend to use Stickles or hot fix crystals instead. But glitter can add such a splash of color!

I used Ritz microfine glitter on the following card....


I'd applied three 1/4" strips of double-sided tape and then embossed it using a Cuttlebug border folder. I then exposed one strip and glittered it. I removed the next liner and added glitter of a different color. You can guess what I did next--yes, I stripped off the last bit and added the final color of glitter, burnishing after each addition. I then stamped my images and sentiment which are all by Hero Arts and were stamped using Memento dye inks. The score lines were made using the Scor-it.


This is a close up of the card. Here you can appreciate the embossed diamonds of the glittered border. Glitter and embossing can be a striking combo. :-)

Tuesday, March 02, 2010

accenting with the Scor-It

If you've arrived via the Scor-it newsletter where I'm featured "In the Spotlight" this month, welcome! The following post is essentially what was linked in the newsletter. I decided to post it here as well since the photos here can be clicked on and enlarged and the effects of the scoring can be better appreciated, I think.

**********

Originally I purchased the Scor-it because of the great scores it would make for my card folds. I use it for a lot more than that these days. I like to use scores as accents on my cards, and I really enjoy using the Scor-it in combination with some of my other crafting tools.

One of my more recent crafting acquisitions has been the Slice by Making Memories. This small electronic die cutter is fun for card making and pairs up nicely with the Scor-it and the sorts of things that I like to do with it.


Pictured above is a tag that I cut with my Slice and scored with my Scor-it.


This is simply a piece of card stock that I scored with the idea of using it later as an accent on a card. The Scor-it ruler made it really easy to score this quickly.


Here is the card that I made with the tag. I'd applied glue to the raised score lines with my Essential Glue Pad and then dusted them with Pearl Ex. The sentiment and die cuts were also made using the Slice. The additional scoring on the green layer was made using the Scor-it.


On this card I used the scored card stock to add some visual interest behind the flowers and the sentiment. Again the die cuts and sentiment were made using the Slice. The stamped image is by Studio G. The embellishments are butterfly shaped Robin's Nest Dew Drops.


Here I combined an accordion fold that I made using the Scor-it with a sentiment that I'd made by cutting out the individual letters with the Slice. I thought it was a fun 3-D look. The flower embellishments are by Prima.

Now for a quickie tutorial. Sometimes I like to make pretty edging even more interesting to look at and to feel.


The above border was made using the Garden Trellis deep edge punch by Martha Stewart. It's gorgeous, but I wanted more! :-)


I decided to try adding a little texture to it by running my scoring tool along the junctions of the trellis.


Here's how it turned out. I liked the effect! Gave it a little more pop.


Here's how it looked when I turned the whole thing into a card. The sentiment is by Hero Arts. The decorative paper is by Autumn Leaves. The background floral stamps and the sentiment were stamped using Memento inks. The flower embellishments are Primas with copper half-pearl centers added.


This is a closer look at that decorative edge. I thought the scoring was a fun addition. :-)

I hope that this post serves as a reminder that there are lots of great crafting tools out there--they can look even better when used to complement each other. Score lines made using the Scor-it can look particularly good when used to embellish die cuts made using manual and electric die cutters. I hope I've shown that scores can add some pop to punched edges, too. It's fun to think about the possibilities. :-)

**********

Thanks to Tim Hammonds for asking me to be featured in his newsletter. I was happy to oblige because I do love to use the Scor-it board and ruler in my crafting. And no, I'm not being compensated for saying that--I'm just a happy customer/crafter. :-) If you aren't a Scor-it newsletter subscriber, it's easy to become one. Just click over to the Scor-it, or rather, the Scor-it-All site, as it's now named. The sign up form is on their homepage. There are lots of great ideas in the newsletters and on the site. And just an FYI, I just published another post that I'd held until the newsletter came out. It features another card made using the Scor-it in combination with a border punch, if you're interested in seeing another example. :-) I also recently added a page to this blog that contains links to the cards/tutorials/info about the Scor-it and Scor-it ruler here on IndigoInklings. The link can be found at the top of my blog page, just underneath the header image.

LinkWithin

Blog Widget by LinkWithin