Showing posts with label polished stone. Show all posts

Wednesday, July 08, 2009

more Scor-It ruler fun & a couple of shout-outs

I'm still having fun making decorative scores with my Scor-It and the new Scor-It ruler that goes with it.

Here are a few more cards that I've made....


Scoring diagonals and diamond shapes is easy when you have a ruler at the top and at the bottom of what you're scoring. The sentiment and images are all by Hero Arts and stamped using Memento dye inks.


Here I was just trying my hand at some decorative scoring to frame an image. I also used some of the newer colors of Ranger alcohol inks for the polished stone background. The stamped images and sentiment are by Hero Arts.


Here's the full view of a Tri-Shutter card design that I had to try. The sentiment here is by Penny Black.


This is just a view to give a better look at the scoring that I did on this card using the Scor-It and its ruler.

Last but not least, I'd like to give shout outs to IndigoInklings blog reader, Vivian, and to the President of HAMMONDSgroup Inc, maker of the Scor-It, Tim Hammonds. Apparently after reading my post about the new Scor-It ruler and my aside about missing one of the little rubber feet on my Scor-It, Vivian dropped a note in Tim Hammonds' inbox. Tim, in turn, surprised me by dropping a note in my inbox, offering to send me a replacement foot for my Scor-It. Wow! That was so cool! The crafting community really is the best. :-) Thank you so much, Vivian. And many thanks also to Tim. I've mentioned here and elsewhere the outstanding customer service that I've received from the Scor-It folks, and this is another fine example of how they go above and beyond when it comes to standing by their product and satisfying their customers. And that's no small feat! ;-) Okay, it may be one small foot in my case, but it's much appreciated. :-)

Wednesday, March 26, 2008

Getting punchy

I finally found some time to do some crafting. I had some new toys to try out, so these cards are the result of that playing.

For this first card I used some of the new Basic Grey Sultry line. Then I used the Tonic border punch system to add the floral accents to the patterned cardstock border. A Fiskars corner punch embellished the red layer. The rose frame is a Cuttlebug die and emboss combo. It doesn't show up well in the photo, but I'd chalked the embossed parts of that frame with pink and green shimmery chalks. The stamped images are by Dee Gruenig.


For this next card I used a piece of polished stone that I'd made some time back. I stamped the row of trees three times without reinking. That image is by Cornish Heritage Farms. The sentiment is by Inque Boutique. This time for the border I used my Tonic Regal punch and border system on the yellow textured cardstock. I embellished with Robin's Nest Dew Drops.


Feels good to get back into crafting after a short hiatus. :-)

Friday, February 29, 2008

I am woman - DCM

Wow, time flies when you do the Daring Cardmakers midweek challenge late in the week! ;-) The new theme is I am woman. Cards should have a feminine image, but there are exceptions! No Tildas, Sugar Nellies, or Bellas. Okay. That works for me. I have some new images that I've been wanting to use and this challenge will be perfect! So, I couldn't make just one--I had to make two cards.


The first card is a Stampinback image on a polished stone background. I used my Diamonds in the Rough and Script Cuttlebug embossing folders on that layer after stamping it. The layer at the top and the cameo are both foil board. I used a Fiskars border punch on the top piece and then embossed it with the Cuttlebug Distressed Stripes folder. A Spellbinders embossing die was used for the cameo. I used black ink to "age" both of the foil board pieces, and interestingly, some of the red color came off, so that added even a little more of a distressed look.


For this card I used chalk inks and dye inks DTP to make the background. The stamp images are all by Mary Mata. I used the Cuttlebug Textile embossing folder on the green layer. I just really like that image of the woman and her umbrella.

Wednesday, February 27, 2008

Stars - Wednesday Stamper

It was time this morning to tackle a Wednesday Stamper challenge. This week is was very straightforward--use stars in making a card. Oh wow, I just realized that I did this in a couple of ways and I hadn't noticed. Here's my card....

This was made by stamping on a polished stone background. I used images by Autumn Leaves and by Stampinback. The flourish designs are the Autumn Leaves and the images with the faces are Stampinback. What I hadn't realized is that the face images look like the face of a "star", someone glamorous who's been in films or something. That was an interesting twist. My subconscious at work. :-)

Wednesday, August 23, 2006

Polished stone

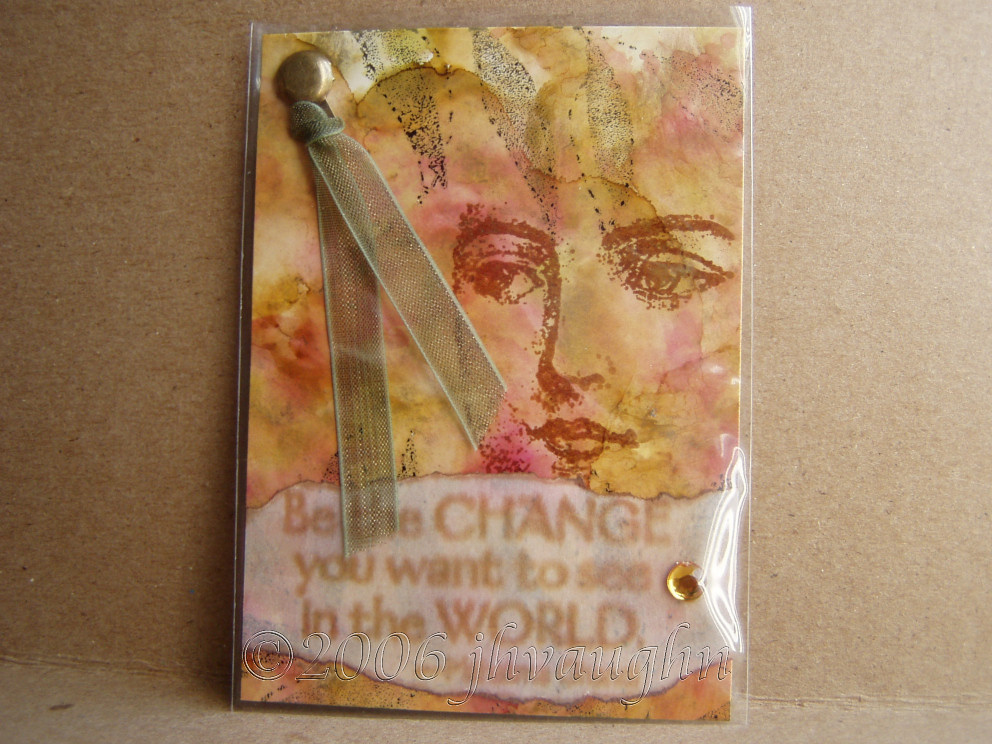
Be the Change

This is an ATC that I put the finishing touches on today. I made it for a Hodge Podge swap--ATCs that will be made using a variety of techniques. The technique that I used is polished stone. I love this technique! It's quick and easy, even though it looks like it might be hard to do. I use glossy paper. I've found out (the hard way) that there IS a difference when it comes to glossy paper. Glossy paper for photos does not measure up to glossy paper that you get from your local stamping or scrapbooking store. The real thing lets you move the inks around and blend them together. Glossy photo paper doesn't give the same kind of look at all. That's my first tip.

Next, I use a felt applicator. You don't have to buy one. You can improvise. I've used an empty plastic medicine bottle before. I stuck the hooked part of some velcro on the lid and attached my square of felt to that. I kept the extra squares inside the bottle. It worked great! I think it's important to use felt though. You can try cotton balls or paper towels, but too much of the ink gets absorbed, rather than getting onto the paper, which is where you want it to be. I guess that'd be tip number two.

The ink that I like to use is alcohol ink. Some people have used dye inks and reinkers. It's almost the same, but again, I feel like the ink moves and blends better when I use alcohol ink. I have some Studio 2 inks, but mostly I use Ranger inks because I love the colors!

To get to the nitty gritty, I get out my supplies then I choose three ink colors. For my ATC up above, I used Cranberry, Butterscotch, and Lettuce. I put several drops of each next to eachother on the felt applicator. I also add some of Ranger's gold mixative, but you can also use a Krylon gold leafing pen and dab it directly on your paper in several spots. The effect will be almost the same. If I'm doing a large area, or if I want my colors to be a bit muted, I'll also add some of Ranger's blending solution to the felt. The substitute for this would be denatured alcohol. Usually something a little stronger than just rubbing alcohol is needed to get the inks moving around.

Once I have all of that in place, I start pouncing the applicator onto the paper. I turn and twist it so that I don't get a repetitive pattern and sometimes I go back over the same areas or leave some of the white showing through. You should start seeing the colors blend though and the gold leaf or mixative will move with the inks and look like veins in your stone. That's it! When you're finished you can buff it a little with a tissue, but it should shiny and marbled.

This is a great technique for backgrounds, and that's probably my favorite way to use it. In the ATC up above I did this technique on an 8 1/2 x 11 inch piece of paper, cut it into ATC size pieces, and stamped on them using permanent dye inks. I've also used polished stone for making die cuts or to add a bit of an accent on a card or layout. This is a fun and easy technique and can look quite elegant. Give it a try!

LinkWithin

Blog Widget by LinkWithin