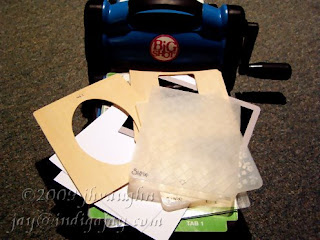
In this first photo are the supplies needed: the Big Shot, multipurpose platform open to Tab 1, one clear cutting plate, two A2 size cards, one shim (Cuttlebug backing), two wood die cut frames, and two textured impressions folders.
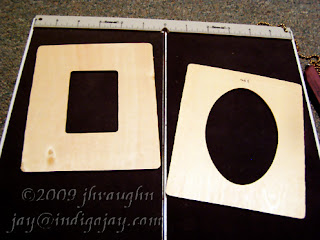
Here is a better look at those wood die cut frames. I bought these at Michaels. You might be able to make out that I labeled the oval one with Tab 1 to make it easy on myself.
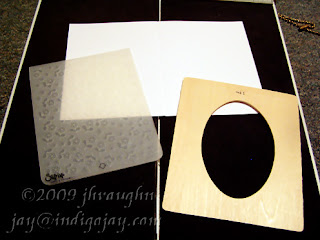
For my first card, I'm using the A2 folder from the Dots & Flowers set and the frame with the oval opening.
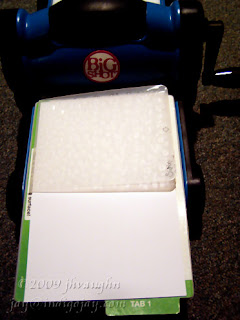
I place the card front inside the folder. When I wrote up creative Cuttling, I tucked the back of the folded card behind the folder. With these Sizzix folders, because of their size and the fact that the design covers the entire card front, the fold is inside the folder and so the back of the card needs to be left hanging out and the folder put through sideways.
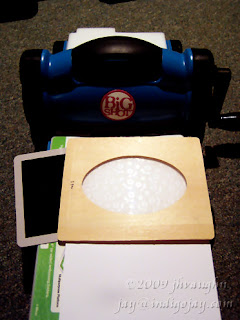
From bottom to top: multipurpose platform open to Tab 1, shim (because I know I'll need one), folder with card front inside, wood die cut frame, clear cutting plate.
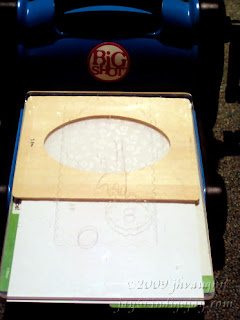
Here's the stack all lined up and ready to be run through the machine.
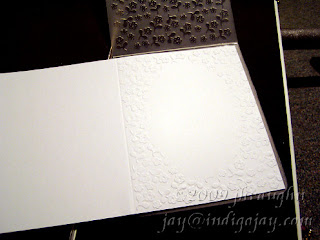
And here's how it turned out.
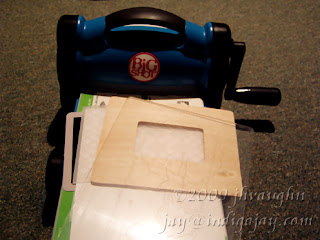
I did the same thing with the other wood frame and the Argyle A2 size Sizzix folder. The stack, or sandwich, was exactly the same.
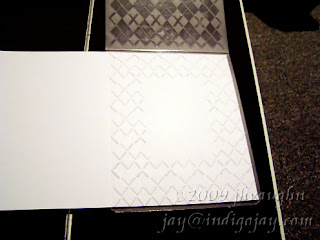
And this is how it looked after rolling it through.
So again, this is very much like creative Cuttling. The only real differences, and they're minor ones, are putting the folder and card through sideways and leaving the back flap of the card as the trailing edge.
A caveat if you're trying this for the first time--machines are different and what works for one might not work quite the same way for another. You may not need to shim, or you may need more shims than I used. You'll have to play with it a bit the first time or two, but after that you should be able to keep using your same combo. Just don't force anything through your machine. There should be a little bit of resistance getting started, but my sandwich rolls through easily once it starts going through.
One last thought, I'd seen somewhere that people were using craft sticks or other items inside their folders to selectively emboss. From the cards that I've seen, that seems to work. I personally prefer placing anything that makes the sandwich uneven on the outside of the folder. I think that gives me the best shot at getting a fairly distinct border between the embossed and unembossed areas. I'm also hesitant to put any uneven pressure on any of the actual design elements inside the folder because I'd hate to mess up parts of the positive or negative face and risk getting a less than crisp and clean emboss when I use the folder normally. I'm all for using things in new and creative ways, but I'd rather not put a good thing at risk. Just my two cents. :-)

a-ha! That makes perfect sense and what a very good idea indeed, I will have to search out some woodcut frames or similar. Thank you!
ReplyDeleteThanks so much for posting this. I really liked the technique and was curious about the details.
ReplyDeleteI love it. just love it. Off I go to experiment!
ReplyDeleteHey I love your blog so much I've given you a blog award....
ReplyDeletehttp://artycrafty.wordpress.com/2009/01/19/award/
WHat a great idea, all I need to do its find the wooden frames or something else similar that might work (maybe mountboard?)
ReplyDeleteThanks, everyone for coming by and commenting. Thank you, artycrafty, for the award, too. :-) And you're right mrsspook, mountboard, matboard, even layers of chipboard will work. Whatever you use just needs to be in the shape that you'd like your embossing to take. I chose the wood die cut because it was convenient--had a couple here already, but that's not the only thing that can be used by any stretch.
ReplyDeleteBrilliant, I really must give it a go. You've been tagged on my blog, go have a lookie....
ReplyDeletexx
So, so, so cool! Thanks for sharing!
ReplyDeleteI LOVE this! Thanks for the tutorial. This is so awesome! TFS!
ReplyDeleteJanet
This is so cool and I love how it turns out. I don't know what a shim is, however. Can someone explain to me? Thanks
ReplyDelete