
 Be the Change
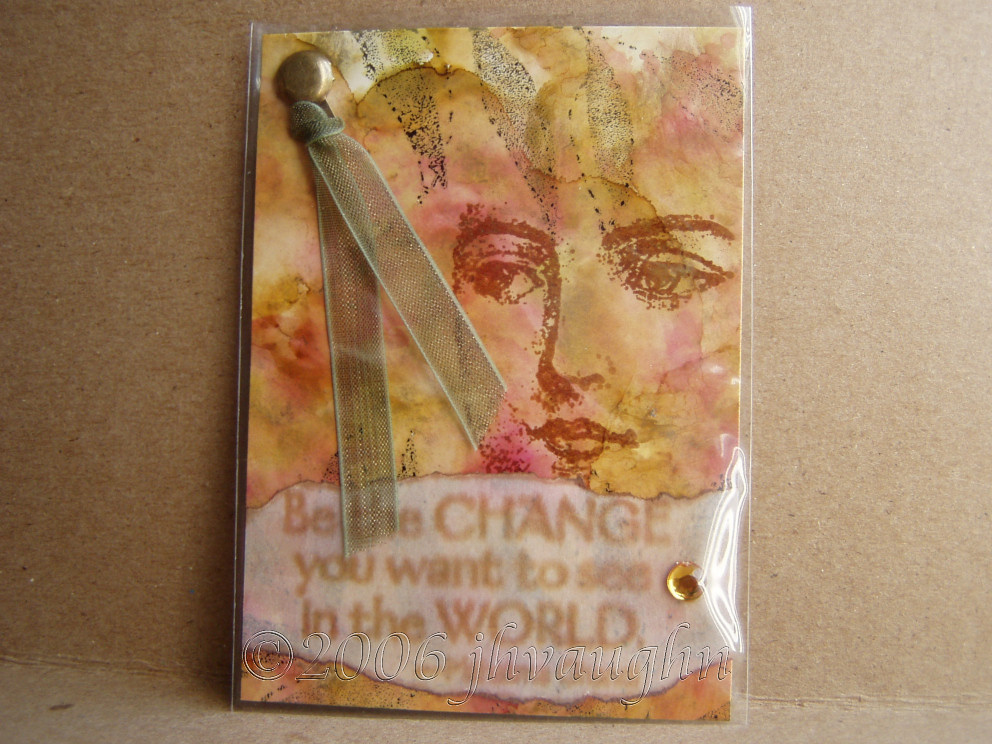
This is an ATC that I put the finishing touches on today. I made it for a Hodge Podge swap--ATCs that will be made using a variety of techniques. The technique that I used is polished stone. I love this technique! It's quick and easy, even though it looks like it might be hard to do. I use glossy paper. I've found out (the hard way) that there IS a difference when it comes to glossy paper. Glossy paper for photos does not measure up to glossy paper that you get from your local stamping or scrapbooking store. The real thing lets you move the inks around and blend them together. Glossy photo paper doesn't give the same kind of look at all. That's my first tip.
Next, I use a felt applicator. You don't have to buy one. You can improvise. I've used an empty plastic medicine bottle before. I stuck the hooked part of some velcro on the lid and attached my square of felt to that. I kept the extra squares inside the bottle. It worked great! I think it's important to use felt though. You can try cotton balls or paper towels, but too much of the ink gets absorbed, rather than getting onto the paper, which is where you want it to be. I guess that'd be tip number two.
The ink that I like to use is alcohol ink. Some people have used dye inks and reinkers. It's almost the same, but again, I feel like the ink moves and blends better when I use alcohol ink. I have some Studio 2 inks, but mostly I use Ranger inks because I love the colors!
To get to the nitty gritty, I get out my supplies then I choose three ink colors. For my ATC up above, I used Cranberry, Butterscotch, and Lettuce. I put several drops of each next to eachother on the felt applicator. I also add some of Ranger's gold mixative, but you can also use a Krylon gold leafing pen and dab it directly on your paper in several spots. The effect will be almost the same. If I'm doing a large area, or if I want my colors to be a bit muted, I'll also add some of Ranger's blending solution to the felt. The substitute for this would be denatured alcohol. Usually something a little stronger than just rubbing alcohol is needed to get the inks moving around.
Once I have all of that in place, I start pouncing the applicator onto the paper. I turn and twist it so that I don't get a repetitive pattern and sometimes I go back over the same areas or leave some of the white showing through. You should start seeing the colors blend though and the gold leaf or mixative will move with the inks and look like veins in your stone. That's it! When you're finished you can buff it a little with a tissue, but it should shiny and marbled.
This is a great technique for backgrounds, and that's probably my favorite way to use it. In the ATC up above I did this technique on an 8 1/2 x 11 inch piece of paper, cut it into ATC size pieces, and stamped on them using permanent dye inks. I've also used polished stone for making die cuts or to add a bit of an accent on a card or layout. This is a fun and easy technique and can look quite elegant. Give it a try!
this is so beautiful! I have yet to try this technique - but your results are so pretty it makes me want to try it!
ReplyDeleteThis is gorgeous, Jay! :) I'm like Nancy - I have yet to try this technique as well. And I have NO idea what's holding me back, either! LOL But after seeing the beautiful samples that you and Jenny have made lately, I think maybe I need to just give it a shot. ;) Thank you for yor lovely inspiration! :)
ReplyDeleteDefinitely do try this technique! It's fun and easy, but it can be addicting!
ReplyDelete